| |
|


|
Creating PivotTables and PivotCharts inside Excel Integra Profiles
This FAQ explains how to create a PivotTables and PivotCharts inside a default formatted (blank) Excel template of an Integra Excel export profile, which values will be automatically populated at runtime based on the data that is exported from Notes to Excel.
The example below outlines the steps required to create a PivotTable and PivotChart. When allowing Integra to automatically create the Excel template for first time, the first worksheet will contain the formatted and blank data block area, which will be populated at runtime with data exported from the Lotus Notes database. The PivotTables and Charts are to be created in additional sheets. In this example the second sheet will contain a PivotChart and the third sheet will contain a PivotTable.
- Create an Integra profile as usual, including creating the Excel template.
- Select the data range:
- Select Edit -> Goto... from the Excel menu bar or press F5.
- Select "_DATABLOCK" from the list of GoTo References. The header and data rows will be highlighted.

- Create the PivotTable in a new Excel sheet:
- Select Data -> PivotTable and PivotChart Report... from the Excel menus bar.
- In step 1 of the PivotTable Wizard, select "Microsoft Excel list or database" and "PivotTable". Click on Next...
- In step 2 of the PivotTable Wizard, the data range should be automatically entered. Click on Next...
- In step 3 of the PivotTable Wizard, select "New Worksheet". Click on Finish. A new Excel sheet will be created containing a blank PivotTable.
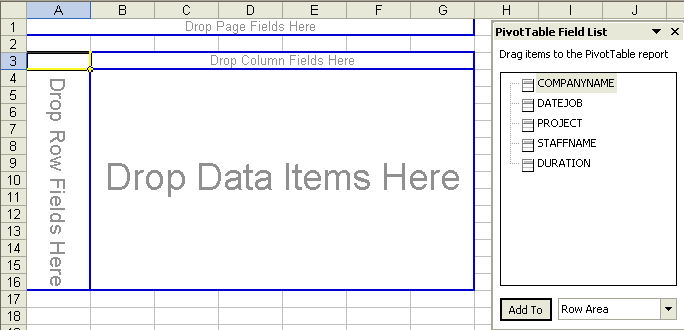
- Drag and drop the fields from the PivotTable Field List dialog into the PivotTable; or select the fields from the PivotTable Field List dialog and clicking on the Add To button.
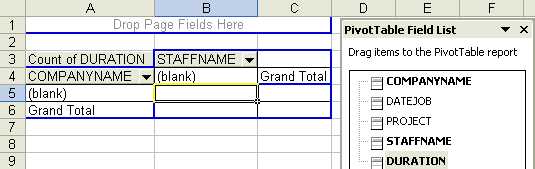
- Format the PivotTable as required.
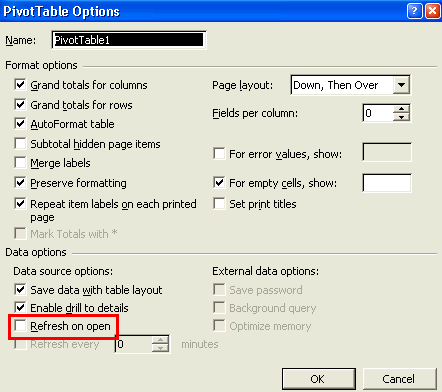
- Right-click on the PivotTable, select Table Options... and make sure that the property "Refresh on open" is disabled.
- Record a macro to refresh the PivotTable:
- Select Tools -> Macro -> Record New Macro... from the Excel menu bar.
- Enter the name of the macro (e.g. RefreshPivotTable) and click on OK.
- Left-click on the sheet containing the PivotTable (Sheet2).
- Right-click on the PivotTable and select "Refresh Data".
- Select Tools -> Macro -> Stop Recording.
- Create a PivotChart:
- Select an area inside the PivotTable.
- Select Insert -> Chart... from the Excel menu bar. A new sheet containing the PivotChart will be created (Chart1).
- Format the PivotChart as required.
- Move the sheet containing the data exported from Notes (Sheet1) to the beginning by dragging Sheet1 before Chart1 and Sheet2; or selecting Edit -> Move or Copy Sheet... when inside Sheet1 and clicking on OK.
- Save and close the Excel template and update the Integra profile with the changes made to the template.
- Call the Excel macro to refresh the PivotTable:
- Open the Advanced tab of the Integra profile
- Goto the Excel/Word macros section of the Advanced Options tab.
- Enable the option Run macro after latst exported Notes document.
- Enter the name of the macro created above (e.g. RefreshPivotTable) in the field that is displayed.
Tip: If you run into problems with the PivotTable or PivotChart layouts, you should enter some dummy data into the sheet containing the data exported from Notes (Sheet1) before creating the PivotTable and/or PivotCharts and then remove this dummy data again once the pivot table and chart have been created. |
. |
|
FAQ# 0164

|
|
|
| |