| |
|


|
Creating Custom Dialogs for Web Profiles
Custom dialog boxes are used by the Integra Profile Creator to present the user with a dialog box on running of a particular Integra profile which is used to allow entry by the end-user of parameters that govern the export or import being done using that Integra profile. An example could be presenting a dialog box to allow the user to enter a date range resulting in Integra exporting only data that has met that date range.
The creation of custom dialogs for Integra profiles run from a Web browser differs from the creation of custom dialogs for Integra profiles run from the Notes client.
Creating a custom web dialog consists of the following steps:
- Creating the Web dialog
- Creating the action button from which the custom dialog will be called
- Filter the documents based on the values entered inside the custom dialog
A. Creating the Web Dialog
The Integra database contains a sample dialog which can be copied and customised to create a dialog for an Integra profile which will be run from inside a Web browser.
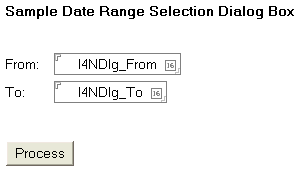
The sample dialog looks like this:
The dialog can be designed in the same manner used to create custom dialogs in Notes using forms, however the following are required:
- The field names must start with prefix "I4NDlg_"
- The Process button found in the custom dialog must be copied into the custom dialog you are creating
The following needs to be done to create a custom dialog:
- Copy the sample form called "Integra4WebCustomDialog" and paste it inside the source Notes database (the one from which you will trigger the Integra profile that will call this dialog).
- Design and format the dialog as required, placing prefix "I4NDlg_" in front of those fields which will contain the values to be used as the filter conditions.
- You may rename the Process button should you wish to use another name.
- The Process button will display an error message to the user if cookies are not enabled. Should you want this message to appear in a language other than English, the message can be amended. This is done by clicking on the Process button and amending the text found in the second line of code inside the Programmer's Pane. The text to be amended is underlined and marked in bold below.
- Rename the form to reflect it's use (note that the name of the form will be used in the next step).
- Save and close the form.
//Enter different messages depending on the language selected by the user
var errmsg = "Integra cannot run because cookies are disabled!";
B. Creating the action button from which the custom dialog will be called
The Integra database provides two action buttons which can be used to call Integra profiles. These buttons are found inside the subform called "Integra4WebActionButtons". The action button called "Integra4Web" is used when calling an Integra profile which does not require a custom dialog to be displayed, while the action button called "Integra4Web (NEW)" is used when calling an Integra profile which requires a custom dialog to be displayed. In this FAQ, we will use the action button called "Integra4Web (NEW)".
The following need to be done to include the action button in your source database:
- Open the subform "Integra4WebActionButtons", found inside the Integra database, and copy the action button called "Integra4Web (NEW)".
- Open the view (or other design element) from where you want to call the Integra profile and paste the action button into the action bar.
- Rename the action button and, if required, assign an icon, change colours, etc.
- Click on the action button you just pasted and look at the code in the Programmer's Pane.
- Enter the name of the form created in the previous step instead of the text marked in bold and underlined in Line 2 below.
- Enter the name of the Integra profile to be executed instead of the text marked in bold and underlined in Line 5 below.
- Specify whether the Integra profile will run on the currently document only (1) or on selected/all documents in the view (0) in Line 10 below.
- Should you wish to display the error message in Line 15 below in a language other than English, amend the text marked in bold and underlined.
- Save and close the view (or other design element) you are currently amending.
Line 1: //Form name for the dialog
Line 2: var frmname = "Integra4WebCustomDialog";
Line 3:
Line 4: // Pre-define profile name or leave blank to prompt user with profile list
Line 5: var ProfileName = "<Enter the name of the profile to run here>";
Line 6:
Line 7: // Set to 1 if Integra shall run on the current document
Line 8: // Set to 0 if Integra shall run on selected documents in view or
Line 9: // on all documents in view (depending on profile settings)
Line 10: var UseCurrentDoc = 0;
Line 11:
Line 12: //Error message displayed when cookies are disabled
Line 13: //You can modify this to display different messages depending on the language
Line 14: //selected by the user
Line 15: var errmsg = "Integra for Notes cannot run because cookies are disabled!";
C. Filter the documents based on the values entered inside the custom dialog
The field-values entered in the custom dialog are temporarily stored in cookies and then passed to Integra's run-time object stats (StaticVars) and stored in the property stats.uservar (variant) as data of type String List with each value stored with its field-name as list entry name. No special formatting is done through this process; default data type conversion (to string) is used.
To utilise the values passed to the stats.uservar property, the profile developer needs to use advanced script (Callback Script field in the Advanced tab of the Integra profile).
Taking the sample dialog mentioned above as an example, the fields entered by the user are I4NDlg_From and I4NDlg_To. The code below (placed in the CB_BFORREADNOTES event) shows how to utilise the user entered values to filter the data-set and export only Notes documents based on given date period (refer to lines 8 to 10 in the example below)
As explained above, the values entered in the custom dialog are stored in a list called stats.uservar and are accessed using the name of the field. Also explained above is that the values received from the list in stats.uservar are all of type string. Depending on the scenario, data type conversion might be required to build a correct filter condition. So it is in our scenario: we need to convert the two date strings back to a date-time data type using the cdat() function (refer to lines 5 & 6 in the example below).
Line 1: case CB_BFORREADNOTES
Line 2: Dim dtfrom As Variant
Line 3: Dim dtto As Variant
Line 4:
Line 5: dtfrom = cdat(stats.uservar("I4NDlg_DateFrom"))
Line 6: dtto = cdat(stats.uservar("I4NDlg_DateTo"))
Line 7:
Line 8: If (stats.expdoc.Date(0) < dtfrom) Or (stats.expdoc.Date(0) > dtto) Then
Line 9: export.continue = False ' Skip the current Notes document
Line 10: End If
Note: The values stored in the stats.uservar list can also be accessed from other events, not just the CB_BFORREADNOTES.
|
. |
|
FAQ# 0165

|
|
|
| |