| |
|


|
How to export computed data to Word or Excel
While Integra for Notes provides facilities for the exporting of data from fields in Lotus Notes documents, it also provides facilities for the exporting of computed data where the data is the result of a calculation or computation. Integra supports the creation of one or more computed fields.
Creating a Computed Field
To create a computed field:
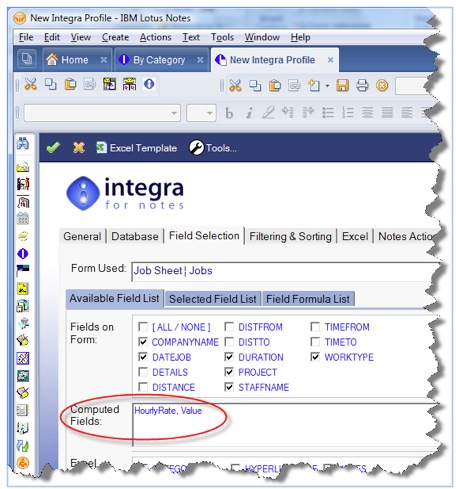 Position yourself within the Field Selection tab of the Integra profile and click inside the rectangular area called Computed Fields. Position yourself within the Field Selection tab of the Integra profile and click inside the rectangular area called Computed Fields.
- Enter the name of the computed field in the Computed Fields area (see screen shot alongside). Use a field name allowed by Notes, which is not already used in your list. If you want to add more than one computed field at a time, enter the name of each computed field followed by a comma.
- Click on the Add button to add the computed field or fields to the Selected Fields List.
- Note that Integra will identify the field’s data type as being of type Formula.
Setting the Value of the Computed Field
The setting of a formula for your computed fields is undertaken in the Field Formula List tab of the Fields Selection tab and by making use of the Formula Builder. On entry into this tab the user is presented with the following screen.
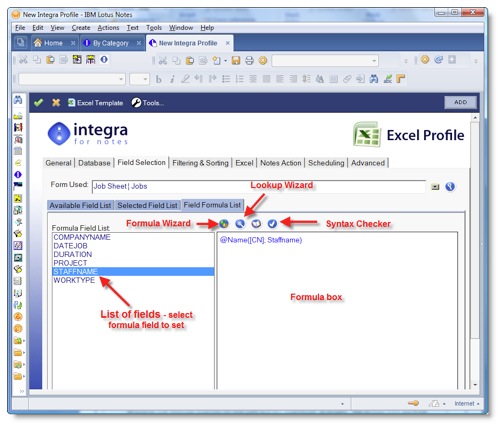 To set the value of a formula for a computed field, select the computed field from the list of fields to the left side (as marked in the screen shot alongside). To set the value of a formula for a computed field, select the computed field from the list of fields to the left side (as marked in the screen shot alongside).
The space to the right side can be used to enter the value of the formula for the currently selected field. Any valid Lotus Notes formula can be utilized in the definition of the computed field including functions such as @IF, @DbLookup and @Dbcolumn for looking up data within the current or another Notes database as well as with ODBC lookups to external databases. Integra supports the concept of a Formula Builder and a Lookup Wizard to allow an easier means of creating such formulae especially for end-users and less experienced developers. See sections 3.3.5 and 3.3.6 of the Integra Designer's Manual regarding the use of the Formula Builder and the Lookup Wizard respectively. Access the Lookup Wizard through the wizard icon and the formula builder through its own distinctive icon.
Integra also offers a syntax checker which will confirm the validity of a formula entered. This syntax checker, which is executed when you click on the Syntax Checker icon to the right of the field selector, will return a dialog box indicating whether a formula is valid and, if invalid, the error message and its location will be identified.
Using the Formula Builder
In addition to the Formula Entry areas, and an identifier of the computed field for which the formula is being created, the Formula Builder presents a panel to the left side allowing access to various elements for the formula to be built.
This Formula Builder consists of the fields, functions and operators. Clicking on the appropriate heading of the Formula Builder pane will display these elements in turn.
- Fields – this displays a list of the Available fields on the selected form. This list is not the list of formula fields but all the fields on the form as all fields on the form can be used within computations of formula fields. The availability of these fields acts as a useful reminder to the user to prompt them for the elements of the formula as it is being built in the Formula Entry Area.
- Functions – clicking on the Functions heading will result in a list of the available functions being displayed in alphabetic order to the user. Clicking on a function and then the help icon will link the user to the Notes help related to this function (only applicable if a user has the Notes Developer Help database deployed on their workstation).
- Operators – this option lists the available Boolean operators. These are listed categorized by type with the most popular comparison operators being listed first. The help option is also available for the currently selected operator.
Selecting a field, function or operator and then clicking on the Append button will result in the selected field, function or operator being appended at the end of the formula already contained in the Formula Entry Area.
Sometimes a user may have entered a formula and wants to insert a function or field in the middle of the formula however double clicking cannot result in this function. In this case we recommend the user will click the Copy to Clipboard button which will copy the highlighted field, function or operator into the clipboard. The user should then place his cursor at the insertion point where the field, function or operator is to be inserted and then use the Notes paste function icon or <Ctrl>+V.
|
. |
|
FAQ# 0283

|
|
|
| |